


QUICK SUMMARY
Dehydrating herbs is one of the easiest ways to extend the life of your organic garden harvest. You can dry herbs in a food dehydrator, hang sturdy stems in small bundles, or spread delicate leaves on a drying rack.
For most herbs, set a dehydrator between 95°F and 115°F. In very humid conditions, a temperature as high as 125°F may be needed. Keep herbs in a single layer with good air circulation and dry them until the leaves are crisp and crumble easily and the stems break instead of bending.
Store fully dried herbs in airtight containers in a cool, dark, dry place. Keep the leaves as whole as possible and crush them right before use for the freshest flavor.
Out of all the ways to preserve your organic garden harvests, dehydrating herbs may be one of the easiest ways to extend the life of your culinary and medicinal bounty.
There are a handful of ways to dry your fresh herbs: drying them on a rack, using a food dehydrator, using a conventional oven that can hold a reliably low temperature, or using the good old-fashioned method of air-drying herbs by hanging them.
The best method depends on the herb, the humidity in your home, and how quickly you need the harvest dried. The goal is always the same: remove enough moisture to prevent spoilage while protecting as much color, aroma, and flavor as possible.
Table of Contents

What Is the Best Way to Dry Herbs?
A food dehydrator is the most dependable way to dry herbs because it gives you controlled low heat and steady air circulation. Hanging herbs is the simplest electricity-free option when the air is dry and the herbs have sturdy stems. A mesh drying rack works beautifully for small leaves, flowers, and short-stemmed herbs that are difficult to bundle.
Choose your method according to the harvest:
- Use a dehydrator for humid weather, tender leaves, large harvests, roots, bark, or faster drying.
- Hang small bundles when the room is warm, dry, dark, and well ventilated.
- Use a drying rack for thyme, loose leaves, flower heads, and other pieces that cannot be tied easily.
- Use an oven cautiously only when it can maintain a low, stable temperature without scorching the herbs.
Drying food works by removing enough moisture that bacteria, yeasts, and molds cannot grow readily. Low humidity, gentle heat, and good air movement are the keys to successful drying. (1, 2)
How to Use a Dehydrator for Herbs
A home dehydrator is a machine that removes moisture from food by combining low heat with moving air throughout its trays or racks. Removing enough water helps prevent mold and spoilage so you can store herbs from your harvest for later use.
By using a machine instead of hanging herbs to dry, you’ll have more control over the temperature and airflow. You can also dehydrate herbs even when the ambient humidity is too high for dependable air-drying. A dehydrator is especially helpful for larger herb pieces, chopped roots, bark pieces, and small leaves that cannot be hung.
Use a dehydrator for fresh herbs when:
- Your home is humid. Air-drying becomes slower and less dependable as humidity rises, increasing the opportunity for mold.
- The herbs are tender or difficult to bundle. Thyme and other small or fragile herbs are easier to spread on a tray.
- Speed is necessary. A dehydrator can dry many leafy herbs in approximately 1 to 4 hours, although the exact time varies by herb, load, humidity, and machine. (1)
- The herbs hold a lot of moisture. Basil, tarragon, mint, and lemon balm benefit from prompt drying and generous airflow.
- You are drying roots or bark. Ginger pieces, medicinal roots, and bark need to be cleaned, cut into reasonably uniform pieces, and dried thoroughly. Identify medicinal plants correctly and confirm that the species and plant part are appropriate before using them.
Best Dehydrator Temperature for Herbs
Preheat your dehydrator and arrange clean herbs in a single layer so the pieces do not overlap more than necessary. Set the temperature between 95°F and 115°F for most herbs. In areas with high humidity, the National Center for Home Food Preservation notes that temperatures up to 125°F may be needed. (1)
The original goal still matters: use the lowest effective temperature so you do not unnecessarily drive off the aromatic compounds that give herbs their flavor and fragrance. At the same time, herbs must dry promptly and completely enough to prevent spoilage. Temperature, air circulation, humidity, leaf thickness, and the amount loaded into the machine all affect drying time.
Check leafy herbs frequently. They are ready when the leaves are crisp, crumble easily between your fingers, and the stems break rather than bend.
Can You Dry Herbs in the Oven?
Many conventional ovens cannot safely maintain temperatures low enough for high-quality herb drying. If your oven has a true low-temperature or dehydrating setting, verify the temperature with an oven thermometer, spread the herbs in a single layer, and check them often.
An oven that runs too hot can brown or scorch the leaves and quickly reduce their aroma. Never leave herbs drying in an oven unattended, and follow the appliance manufacturer’s guidance about door position and minimum operating temperature.
As for microwaves to dehydrate herbs, I dislike using microwaves at all for any cooking or medicinal purposes. See more about microwaves and why I avoid them. As my Mom, Mimi, says, “It will cook out all the oils, so don’t do it!” Can you tell it's not my favorite method? It’s far too easy to scorch your herbs or overheat spots when trying to dry in a microwave to make this method truly unuseful.
Hanging Herbs to Dry
If you live in an area with low indoor humidity, you can simply hang your herbs to dry. This is my favorite method when it comes to simplicity and avoiding electricity use. Sturdy herbs that grow on stalks are best for this method unless you use drying racks as mentioned below.
Rather than relying on one exact humidity cutoff, watch the room and the herbs. Choose a dry, well-ventilated place where bundles dry steadily without condensation, musty odors, or visible mold. If drying is slow because the air is humid, switch to a dehydrator.
Herbs that can dry well in small bundles include:
- Chamomile
- Dill
- Fennel
- Lavender
- Lemon Balm
- Marjoram
- Parsley
- Rosemary
- Sage
- Stevia
- Summer Savory
Some of these herbs have delicate flowers or moisture-rich leaves, so keep bundles small and inspect them closely. When in doubt, use a drying screen or dehydrator instead.
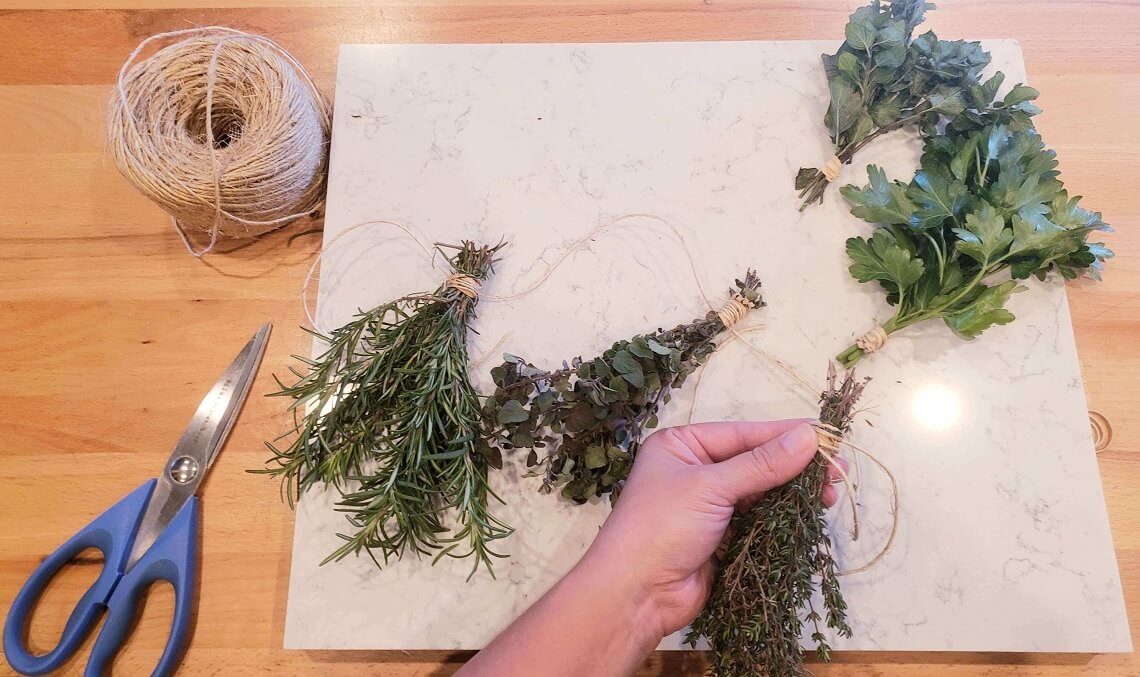
The hang-drying method is as simple as one, two, three. Pick from your herb garden, wash them when needed, dry off all surface moisture, and tie them with twine or rubber bands.
1. Pick your herbs. Harvest after the morning dew has dried but before the day becomes hot. For many leafy herbs, flavor is strongest just before the plant flowers. Leave enough stem to tie and hold the bundle together, and never harvest more than the plant can spare.
2. Sort, wash, and dry them thoroughly. Discard any parts that are pest-infested, moldy, mildewed, bruised, diseased, or decaying. Rinse visibly dirty herbs under cool running water. Shake them well, use a salad spinner, or blot them carefully with clean towels. Do not bundle herbs while surface water remains.
3. Tie them into small bundles. You can use natural twine, which may need to be tightened partway through drying, or rubber bands that contract as the stems shrink. Keep the bundle small enough that air reaches the center. Large, dense bundles hold moisture and are more likely to mold.
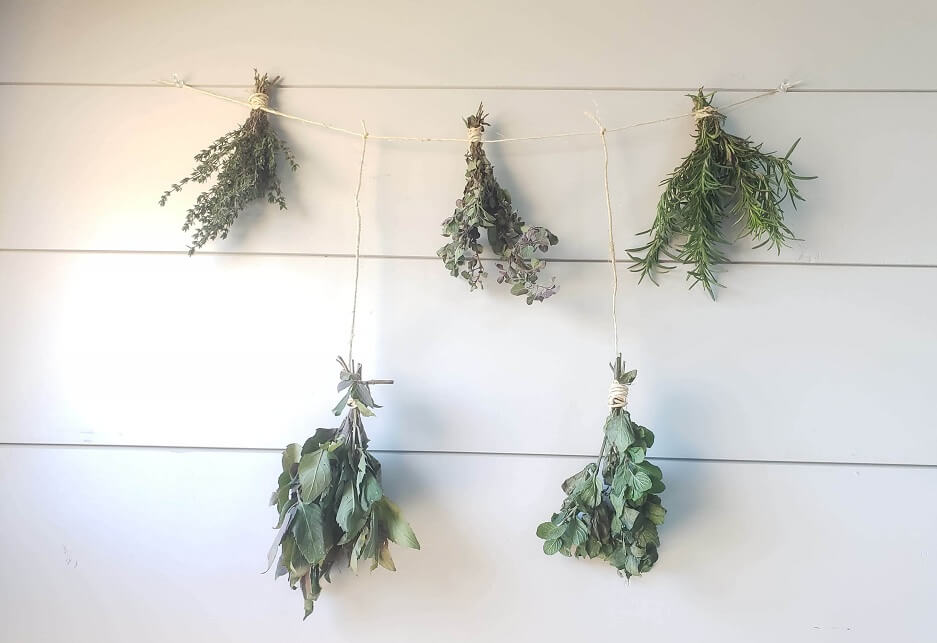
4. Hang them in the right place. Hang the bundles upside down in a dry, well-ventilated location away from direct sunlight, cooking steam, dust, and outdoor contaminants. A loosely fitted paper bag with ventilation holes can help protect the herbs from dust while allowing air to move. Label each bundle with the herb name and harvest date.

You can hang them on a hanging rack, or tie them up with twine and hang them on a wall in a cool, dark place. A comfortable, dry room with steady air circulation is ideal. We always use a paper label with our tied herbs so we know exactly which herbs are hanging and when we put them up to dry.
You can also use a similar traditional method with peppers. Simply thread twine through a wide-eyed needle, pierce it through the tops of sound, undamaged peppers, and hang them with space between each pepper. Because peppers are thicker and hold more moisture than leafy herbs, inspect them carefully and use a dehydrator when humidity is high or drying is uneven.
Excess moisture or humidity can cause mold, and too much sun and heat can leave dehydrated herbs faded and tasteless.
Many bundles take about 7 to 14 days to dry, but time is only an estimate. The herb, bundle size, airflow, temperature, and humidity determine the actual drying time. You’ll know the herbs are finished when the leaves are crisp and crumble easily and the stems snap instead of bending.
Once your home-dried herbs are finished, carefully remove them from their stems by stripping the foliage from the stems, keeping the individual leaves as whole and unbroken as possible. This will help preserve their flavor throughout the winter months.
Finish by labeling the container with the plant name and drying date. Store the herbs in an airtight container out of direct sunlight, and crumble the whole leaves right before using.
Dehydrating Herbs on a Drying Rack
An alternative method for drying herbs is a drying rack similar to a small, widely spaced oven rack or mesh screen. Think of a clean window screen set horizontally so air can circulate above and below the herbs. For fragile or short-stalked herbs like thyme, a drying screen or food-safe mesh liner can be a better option than hanging.
Do not use rusty, painted, or chemically treated screen material. Choose a clean food-safe surface and protect the harvest from pets, insects, dust, and direct sunlight.
The same rules apply: don’t overcrowd your herbs. Keep them spread in a single layer with plenty of air circulation in a dry location. Turn or gently move the herbs periodically if that helps them dry evenly. If they remain soft, damp, or musty after several days, move them to a dehydrator before mold develops.
Tips for Dehydrating Herbs Properly
If you’re trying to dehydrate quality herbs, keep these tips in mind:
- Harvest at the right time. Pick after dew has dried and before the hottest part of the day. For many culinary herbs, harvest before flowering for the most concentrated flavor.
- Start with healthy plant material. Drying does not make moldy, diseased, dirty, or incorrectly identified herbs safe.
- Remove surface moisture. Wet leaves take longer to dry and can trap moisture in bundles or on crowded trays.
- Keep the layers thin. Air needs to reach every side of the leaves. Avoid dense bundles and overloaded dehydrator trays.
- Label your herbs. Include the plant name and drying date. Trust me, you don’t want to skip the labeling step.
- Test for dryness, not just time. Leaves should be crisp and crumble easily. Stems should snap instead of bending. If you are unsure, keep drying at a low temperature and test again.
- Do not package warm herbs. Let them cool completely first so condensation does not form inside the container.
- Inspect the first few days. If you see condensation inside the jar, remove the herbs and dry them longer. Discard any batch that smells musty or shows mold.
- Keep the leaves whole. Whole leaves hold their aroma longer than pre-crushed herbs. Crumble or grind them when you are ready to cook.
Fresh Herbs to Dried Herbs Conversion
Many dried herbs have a more concentrated flavor than fresh herbs. A useful starting point is:
- 1 tablespoon fresh herbs = 1 teaspoon dried herbs
- Use about three times as much fresh herb as dried herb
This is a flavor guideline, not a universal medicinal-dose conversion. Potency varies by plant, harvest, storage, preparation, and intended use. Do not convert a medicinal preparation from fresh to dried herbs without a trusted formula or qualified guidance.
How to Store Dried Herbs
Store fully dried herbs in clean, airtight glass, metal, or food-grade containers in a cool, dark, dry cupboard. Light, heat, air, and moisture gradually weaken color, aroma, and flavor.
Use these storage habits:
- Label the container with the common name, botanical name when relevant, plant part, and drying date.
- Keep containers away from the stove, dishwasher, sink, sunny windows, and other sources of heat or steam.
- Do not pour herbs directly from the storage jar over a bubbling pot. Steam can enter the container and compromise the remaining herbs.
- Measure herbs into a separate spoon or bowl before adding them to food.
- Check stored herbs periodically for condensation, clumping, insects, musty odors, or visible mold.
- Use dried culinary herbs within about one year for best quality, replacing them sooner when their aroma and flavor noticeably fade. (3)
A good rule of thumb is that if your herbs have almost no scent when rubbed between your fingers, they will contribute very little flavor. That does not prove whether a medicinal herb is effective or safe, but it is a practical sign that culinary quality has declined.
Dehydrating Herbs FAQs
What temperature should I use to dehydrate herbs?
Set a food dehydrator between 95°F and 115°F for most herbs. In a very humid environment, a temperature up to 125°F may be needed. Follow the dehydrator manufacturer’s instructions and check herbs frequently because thin leaves can dry quickly. (1)
How long does it take to dehydrate herbs?
Many leafy herbs take approximately 1 to 4 hours in a dehydrator. Hanging bundles commonly take 7 to 14 days. These are estimates. Humidity, airflow, leaf thickness, bundle size, tray load, and the specific herb can shorten or lengthen drying time.
Should I wash herbs before dehydrating them?
Discard damaged or moldy plant material first. Rinse herbs under cool running water when they are visibly dirty, then remove all surface moisture before drying. Wet herbs dry slowly and are more likely to spoil.
How do I know when dried herbs are done?
Leaves should feel crisp and crumble easily, and stems should break instead of bending. There should be no cool, soft, or damp spots. If herbs soften inside the storage container or condensation appears, return them to the dehydrator immediately.
Can herbs be dried in the oven?
Yes, but only when the oven can maintain a reliably low temperature. Many conventional ovens run too hot for high-quality herb drying. Use an oven thermometer, keep the herbs in a single layer, check them often, and follow the appliance manufacturer’s safety instructions.
Can I dry different herbs together?
You can dry herbs together when they require similar temperatures and drying times, but strong aromas can mingle and thin herbs may finish before thick ones. Separate trays or batches make it easier to remove each herb when it is fully dry.
Why did my dried herbs mold?
The herbs were probably packaged before they were fully dry, bundled too densely, dried in a humid room, or exposed to moisture during storage. Discard moldy herbs. Do not try to salvage them by picking out visible mold or drying the batch again.
How long do home-dried herbs last?
Properly dried and stored culinary herbs can remain usable beyond one year, but flavor, color, and aroma decline over time. For the best kitchen quality, plan to use and replace them within about a year.
Can I use home-dried herbs medicinally?
Only use a medicinal herb when you have correctly identified the species and plant part and know the appropriate preparation, amount, duration, contraindications, and medication interactions. Drying preserves plant material, but it does not make every herb appropriate or safe for medicinal use. Get qualified guidance for pregnancy, nursing, children, chronic illness, medication use, or unfamiliar herbs.
Final Thoughts on Dehydrating Herbs
Dehydrating herbs works for many types of plants and can be a budget-friendly way to preserve your organic garden harvest. With a dehydrator, a simple hanging rack, or a clean mesh screen, you can keep the flavor of your garden close at hand long after the growing season ends.
The secret is not complicated: start with healthy herbs, remove surface moisture, give them plenty of air, dry them completely, and protect them from heat, light, and humidity during storage.
There is something deeply satisfying about opening a labeled jar in the middle of winter and knowing those herbs came from the garden you tended with your own hands. Good stewardship often looks like simple work done carefully, one harvest at a time.
- National Center for Home Food Preservation. “Herbs.” University of Georgia. National Center for Home Food Preservation.
- University of Minnesota Extension. “Preserving Food at Home: Drying.” Reviewed 2024. University of Minnesota Extension.
- Penn State Extension. “Sweet Woodruff in the Garden and the Kitchen.” Updated March 17, 2026. Penn State Extension.
- Penn State Extension. “Let’s Preserve: Drying Herbs.” Updated July 31, 2023. Penn State Extension.


